About
FAQ
Lessons
Downloads
Links
Further
Reading
Lesson 2: Experiments at High Speed!
Having mastered the control of the camera, you are now ready to see Warp do what it was designed to do. That is showing you what things would look like at (very) high speeds. To change the speed you need to use the Speed Bar on the left hand side of the Console Bar, as shown below.

The green line indicates your current speed in the direction of the z-axis of the Warp universe. The z-axis is directly into the screen when you start Warp, and the camera's velocity is always along this axis. By clicking with the left mouse button on the Speed Bar and dragging the mouse, you can change your speed. The line will change size to indicate the speed. Furthermore, its colour will gradually change to yellow as you get close to the speed of light. The scale of the Speed Bar is logarithmic. This means that the Speed Bar is clearer at higher speeds. For example, leftmost tick mark (the one above the '0') indicates a speed of 0 m/s. The rightmost tick mark (the one above the 'c') indicates the speed of light (exactly 299,792,458 m/s !). The marks in-between from left to right indicate 20%, 40%, 60% and 80% of the speed of light respectively. This logarithmic scale allows you to vary your speed more sensitively as you approach the speed of light. Instead of using the mouse, it is possible to change your speed using the keyboard, which can be more sensitive than the mouse.
- Press 'a' to increase your speed.
- Press 'z' to decrease your speed.
This is all well and good, but the exciting stuff happens in the main window. Try this . . .
- Rearrange the camera and teapot so that it is off centre.
- Increase the speed gradually from 0 m/s to about 90% of the speed of light.
- You should see the teapot shoot of into the distance. Don't worry! This is meant to happen! More about this in Lesson 3, but for now bring back the teapot by holding down the space bar. The teapot will come rushing towards you. Let go of the space bar when the teapot is nearby. If the teapot went too far, hold down return to bring it back.
You'll probably see something a bit like below . . .
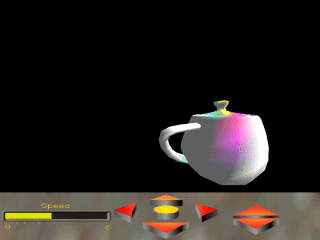
Wooahh! What's going on here? Our teapot has been hideously deformed. And it changed colour. And, is it just me, or did it get brighter too? Well, I'm sure the physicists among you will tell us that this is all down to Einstein's Theory of Special Relativity. In fact there are three different effects going on here.
- Lorentz Transformations
- Doppler Effect
- Headlight Effect
We will explain these one at a time in later lessons. But first, try holding down the 'space bar' again. You should see the teapot shoot of past you. What you are doing is setting time in motion. Whereas before time was frozen and you were seeing a snapshot of the teapot, by pressing the 'space bar' you increase time by a small amount. The teapot there for starts moving because of it's velocity relative to the camera. You can reverse time by pressing 'Return'. And if things get completely out of hand, you can set the time back to zero by pressing 't'. So just for completeness . . .
- Press the 'space bar' to increment the time in the Warp universe.
- Press 'Return' to reverse increment the time.
- Press 't' to reset the time.
Anyway, now that's sorted, you are ready to learn about Lorentz Transformations in Lesson 3.
![]()