About
FAQ
Lessons
Downloads
Links
Further
Reading
Lesson 5: Bright Lights - The Headlight Effect
We now turn our attention to one of the stranger effects of special relativity, the headlight effect. The best way to explain this is to imagine a torch that, in its own frame, emits a beam of light in the shape of a cone. This cone's sides make an angle of phi with respect to the x-axis (i.e. the torch is pointing along the x-axis). This is shown in the following diagram.

Now imagine that the torch moves along the x-axis with some velocity, v. Contrary to what you might expect, the angle phi will become narrower! This contraction is known as the Headlight effect. The amount that phi narrows is given by the following equation:

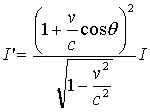
So what does this mean in relation to Warp? Well, the important thing to note is that the torch isn't giving off any less light. The same amount of light is being focused into a smaller area. Therefore, an approaching torch will seem brighter than a stationary torch. Likewise, a receding torch will appear darker. This doesn't just apply to torches. It also applies to any object traveling towards an observer. The change in light intensity, I, is given by the following relationship:
 .
.
You can see the headlight effect in Warp by trying the following:
- Arrange the object as you like it.
- Press 'd' to turn off the Doppler effect.
- Increase the speed to some arbitrary value.
- Guess what? Use 'space' and 'return' to alter the time and hence view of the object. Boy, I get tired of saying that!
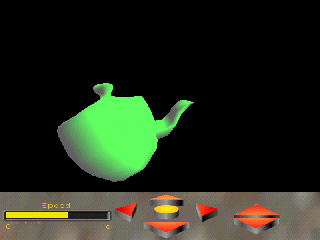
If you arranged the object so that it is speeding towards you then you should see something like this:

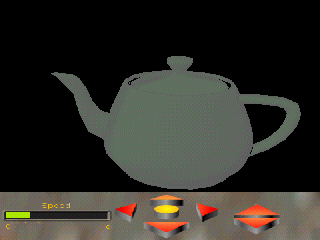
Notice how bright the teapot is. However, if the object is traveling away from you then you should see something more like this:

Here the headlight effect has darkened everything to such an extent that you can't see much of the original colour! Of course this can be a bit of a pain so you can turn the headlight effect off:
- Press 'h' to toggle the headlight effect on / off.
Okay, you should now understand all of the relativity effects that Warp simulates. The best way to learn about these things is to have a play around with Warp, and see what you can do. However, by now you are probably bored with the teapot and want to try other things. Well, that's the subject of the next lesson.
![]()